TV Volume Loudness Guard using Arduino
UPDATES
STEP 1 - Introduction
What can be more annoying than those TV commercials on steroid? Here you are watching your favorite TV show when all of a sudden you are ambushed by a very loud TV commercial sending you scrambling for the remote control to turn down the volume.
In some countries it's now illegal for broadcasters to blast the volume during commercials. But in many others, this TV audio terror is still legal. I hope my TV Volume Loudness Guard will mitigate some of this ad-driven rudeness.
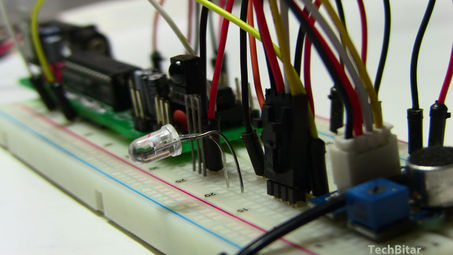
The TV Volume Loudness Guard will listen to your TV and if the volume goes higher than a certain level, it will bring it lower.
There are many uses for this gadget such as keeping the TV volume down when you are in a different room while the kids are watching their favorite music channels. Or when someone blasts the stereo system. The TV Loudness Guard will be ready to keep a lid on it. The TV Loudness Guard should be part of every Big Brother's bag of tricks :)
HOW THIS GADGET WORKS
Place the Arduino TV Volume Loudness Guard close to the TV set to monitor the volume. When the volume loudness of your TV exceeds a certain threshold (set by you in the program or via a trimpot), the gadget sends a Volume Down remote control code to your TV--or any other remote controlled gadget for that matter--until the TV volume falls below the pre-set level. This level can be changed in the program you upload to Arduino or with a potentiometer built into the sound sensor I am using in this project.
WORKFLOW
There are three steps to make use of the TV Volume Loudness Guard:
- Feb 22, 2013 Featured on PC Word: http://goo.gl/eNjexY_
- Mar 05, 2013 Featured on WonderHowTo http://goo.gl/fpeVC
- Feb 14, 2013 Featured on LifeHacker http://goo.gl/tx4QG
- Feb 13, 2013 I have updated the Arduino program in step 4 to support additional remote controls.
- Feb 13, 2013 Featured on Dangerous Prototypes http://goo.gl/DJcwe
- Feb 12, 2013 Featured on Semageek http://goo.gl/EH58K
- Feb 12, 2013 Featured on Embedds http://goo.gl/Z3egm
- Feb 12, 2013 Featured on Hackaday http://goo.gl/8MkuE
STEP 1 - Introduction
What can be more annoying than those TV commercials on steroid? Here you are watching your favorite TV show when all of a sudden you are ambushed by a very loud TV commercial sending you scrambling for the remote control to turn down the volume.
In some countries it's now illegal for broadcasters to blast the volume during commercials. But in many others, this TV audio terror is still legal. I hope my TV Volume Loudness Guard will mitigate some of this ad-driven rudeness.
The TV Volume Loudness Guard will listen to your TV and if the volume goes higher than a certain level, it will bring it lower.
There are many uses for this gadget such as keeping the TV volume down when you are in a different room while the kids are watching their favorite music channels. Or when someone blasts the stereo system. The TV Loudness Guard will be ready to keep a lid on it. The TV Loudness Guard should be part of every Big Brother's bag of tricks :)
HOW THIS GADGET WORKS
Place the Arduino TV Volume Loudness Guard close to the TV set to monitor the volume. When the volume loudness of your TV exceeds a certain threshold (set by you in the program or via a trimpot), the gadget sends a Volume Down remote control code to your TV--or any other remote controlled gadget for that matter--until the TV volume falls below the pre-set level. This level can be changed in the program you upload to Arduino or with a potentiometer built into the sound sensor I am using in this project.
WORKFLOW
There are three steps to make use of the TV Volume Loudness Guard:
- Capture & decode your remote control Volume Down button (or any other remote function). This feature is included in my gadget.
- Update the TV Loudness Guard program with the remote control button code captured from step 1 and upload the program to your Arduino.
- Power the TV Loudness Guard and place it next to your TV. Fine-tune the parameters of the Arduino program and the sound sensor's potentiometer until you get the desired results.
Step 1: PROJECT PARTS
HARDWARE
SOFTWARE
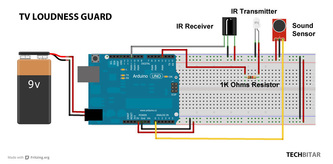
- GOduino III or Arduino Uno. You should be able to get this project to work with most Arduinos with some tweaking.
- Sound Sensor ($4 from ebay). I used Seeed's sound sensor
- IR 940nm LED Transmitter .($0.10 from ebay)
- IR Receiver 38Khz 3-pin not the 2-pin LEDs. ($1 from ebay) I got mine from Tayda2009.
- 1K Ohms resistor.
- Breadboard.
- Jumper wires.
- Power: you can use USB power or any battery that can source 7V to 12V and over 500mA.
SOFTWARE
- The Arduino IDE (Download from http://arduino.cc/en/Main/Software)
- IRremote library. Download from https://github.com/shirriff/Arduino-IRremote and extract the content of the zip file to folder Arduino\libraries\IRremote
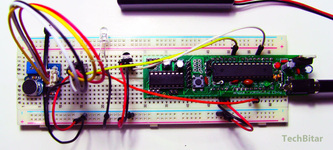
Step 2: WIRING THE TV LOUDNESS GUAR
SOUND SENSOR
IR TRANSMITTER LED
IR 38KHZ RECEIVER (FACING YOU)
- GND pin ---> Arduino GND pin
- VCC pin ---> Arduino 5V pin
- SIG pin ---> Arduino A0 pin
IR TRANSMITTER LED
- Cathode ---> Arduino GND
- Anode ---> 1K Ohms ---> Arduino pin 3 (PWM)
IR 38KHZ RECEIVER (FACING YOU)
- Right Pin ---> Arduino 5V pin
- Middle Pin ---> Arduino GND pin
- Left Pin ---> Arduino 11 pin (PWM)
Step 3: DECODE YOUR REMOTE CONTROL BUTTONS
There are many remote control protocols out there supported by leading vendors such as Sony, NEC, Panasonic, etc. If your TV is not one of those brand named, chances are its remote control adheres to one of the popular remote control protocols supported by the leading vendors.
Since our gadget needs to simulate sending a Volume Down remote control command whenever the TV volume is too high, we need to figure out what's the code for any particular TV remote. This is done easily using the example program provided by the IRremote library.
Since our gadget needs to simulate sending a Volume Down remote control command whenever the TV volume is too high, we need to figure out what's the code for any particular TV remote. This is done easily using the example program provided by the IRremote library.
- With the TV Loudness Guard gadget fully wired, connect your Arduino to your PC.
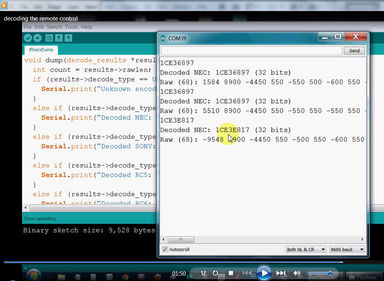
- From the Arduino IDE, load the example file IRrecvDump which can be found under menu File/Examples/IRremote
- Open the Arduino IDE serial monitor.
- Point your remote control at the IR LED receiver (3 pin) and press the Volume Down button. You will see numbers being displayed on the Serial Monitor.
- Record the short number generated when you pressed your remote button. In my case, the volume down button was 1CE3E817 and the bit count (e.g. 32 bit) which I will see in my Arduino program. You need to replace my remote code with your captured remote control code for your Volume Down button.
Step 4: PREPARE THE ARDUINO PROGRAM
At the top of the Arduino program below there is a number of lines starting with #define LABEL NUMBER This is to make it easier to control how the program behaves. The LABEL is the thing you want to control in the program behavior and the NUMBER is the value of the thing you want to control. Here's an explanation of the relevant #define lines.
REMOTE BUTTON CODE & BIT
#define REMOTE_CODE Your remote code as returned by the IRrecvDump decoder utility prefixed with "0x"
#define REMOTE_BIT Your remote code data size as returned by the IRrecvDump decoder utility.
This Arduino program works for most remote controls but you need to tell it about your remote control protocol from the info you gathered in the previous step when you decoded your remote control buttons using IRrecvDump utility. It's possible to make the remote selection dynamic during run time so you don't have to change and upload code. I might do this in a later version of this gadget.
VOLUME LEVEL THRESHOLD
#define NOISE_LEVEL A number from 0 to 1024. Start with 500 then fine-tune the number.
This is the number that decides at what point the Arduino will start transmitting Volume Down codes
NOTE: The sound sensor I am using as a built-in potentiometer which also controls the sensor's sensitivity.
VOLUME CHANGE SPEED
#define REPEAT_TX (from 1 to as many as you want. Start with 3 then fine tune)
Change how many times you want the remote code transmitted to the TV. If you want more drastic drop in TV volume increase this number. If you want a more gradual change in volume, lower this number.
FEATURE TODO LIST
It's very simple to program more functionality into this gadget. Some of the features that can be added:
THE ARDUINO CODE
Cut and paste the code below into your Arduino IDE
REMOTE BUTTON CODE & BIT
#define REMOTE_CODE Your remote code as returned by the IRrecvDump decoder utility prefixed with "0x"
#define REMOTE_BIT Your remote code data size as returned by the IRrecvDump decoder utility.
This Arduino program works for most remote controls but you need to tell it about your remote control protocol from the info you gathered in the previous step when you decoded your remote control buttons using IRrecvDump utility. It's possible to make the remote selection dynamic during run time so you don't have to change and upload code. I might do this in a later version of this gadget.
VOLUME LEVEL THRESHOLD
#define NOISE_LEVEL A number from 0 to 1024. Start with 500 then fine-tune the number.
This is the number that decides at what point the Arduino will start transmitting Volume Down codes
NOTE: The sound sensor I am using as a built-in potentiometer which also controls the sensor's sensitivity.
VOLUME CHANGE SPEED
#define REPEAT_TX (from 1 to as many as you want. Start with 3 then fine tune)
Change how many times you want the remote code transmitted to the TV. If you want more drastic drop in TV volume increase this number. If you want a more gradual change in volume, lower this number.
FEATURE TODO LIST
It's very simple to program more functionality into this gadget. Some of the features that can be added:
- Average audio level over a period of time to determine if increase in volume is persistent requiring volume control or momentary and should be ignored.
- Read audio level after a period of time. If audio is too low, increase volume by a certain increment.
- Make program inclusive of supported remote protocols
- Add Panasonic & JVC support
THE ARDUINO CODE
Cut and paste the code below into your Arduino IDE
Code Editor


