IR Remote Control Station for SensoDuino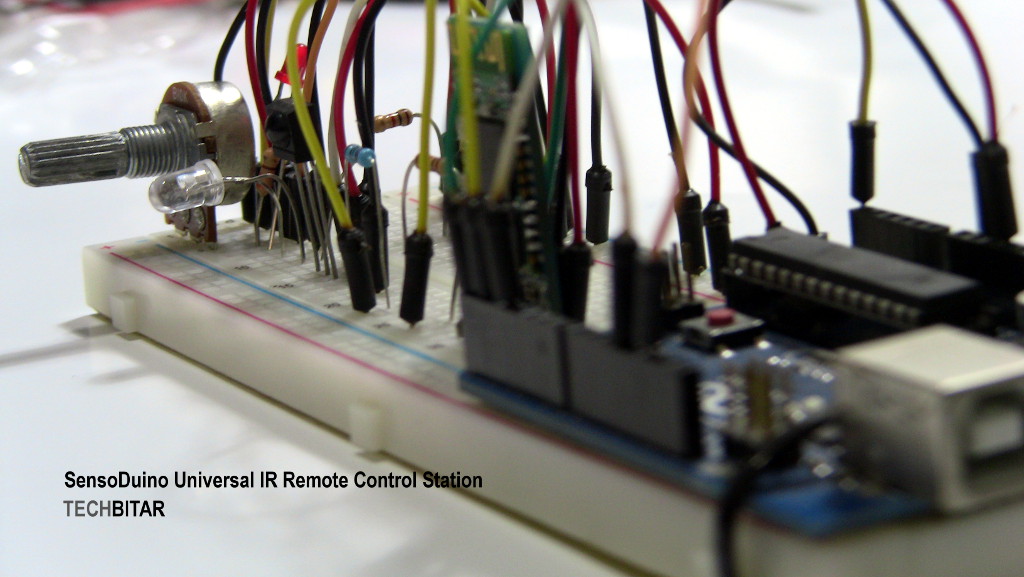
INTRODUCTION
In this guide I will explain the making and operation of a simple Arduino-based IR Remote Control Station (IR Station) circuit that will be used to take commands from Android over Bluetooth then translate and send out corresponding IR remote control commands. You can use the IR Station to automate most IR remote controlled gadgets to turn gadgets on/off or to increase/decrease volume, brightness, speed and so on. For this guide, as an example, I will use the IR Remote Control Station to fight back against loud and annoying TV and radio commercials by sensing the audio level with Android/SensoDuino then sensing remote control commands to turn down the volume. In more technical terms, I will automate the process of monitoring the volume coming out of a TV or stereo with the help of an Android app SensoDuino to automatically reduce the volume during abrupt loud commercials or even when teenagers around the house blast the TV or stereo. You can apply the concepts discussed here to almost anything with an IR remote control. With the use of a potentiometer you can control the threshold of noise. SENSODUINO Think of the SensoDuino Android app as a dozen or more free virtual shields for your Arduino each supporting a different sensor and function. All you need is your Android phone, Arduino, and a $10 HC-05 Bluetooth module. SensoDuino captures data from sensors built into your Android mobile device such as GPS, audio, gyro, date/time then transmits this data over an HC-05 Bluetooth (or comparable) module to Arduino or any device equipped with Bluetooth capabilities be it Windows PC, Mac, or microcontroller. A while ago, I published another project the "TV Volume Loudness Guard" using a dedicated component for the Audio sensor. The beauty of the IR Station for Android is that any function/sensor in your Android device can become a trigger for IR remote controlled action such as light level to turn room light on/off or Time/Date value to turn heater on/off or the orientation sensor to trigger an alarm if movement is detected. Your Android device is a powerhouse of sensors and functions that are harnessed by SensoDuino for easy use. IR STATION BUILD STEPSThere are four major steps to building and operating the IR Remote Control Station.
1) WIRE THE IR STATION: Gather the components and wire them according to the diagrams in the next section. 2) CAPTURE YOUR REMOTE CONTROL IR CODES: Capture & decode your remote control Volume Down button (or any other remote function). This feature is included in the IR Station. 3) MODIFY & UPLOAD ARDUINO FIRMWARE: Update the Arduino IR Station sketch with the remote control button codes captured from step 2 and upload the program to your Arduino. 4) OPERATE THE IR STATION: Power the IR Station and place it next to your TV or any remote controlled gadget. Make sure the transmitter LED's top is facing your TV's IR receiver. Use the potentiometer to determine at what point you want the IR Station to kick in and start sending IR codes such as Volume Down, Off/On, Mute, Forward/Rewind, etc. Fine-tune the parameters of the Arduino program and the potentiometer until you get the desired results. OPERATIONAL OVERVIEW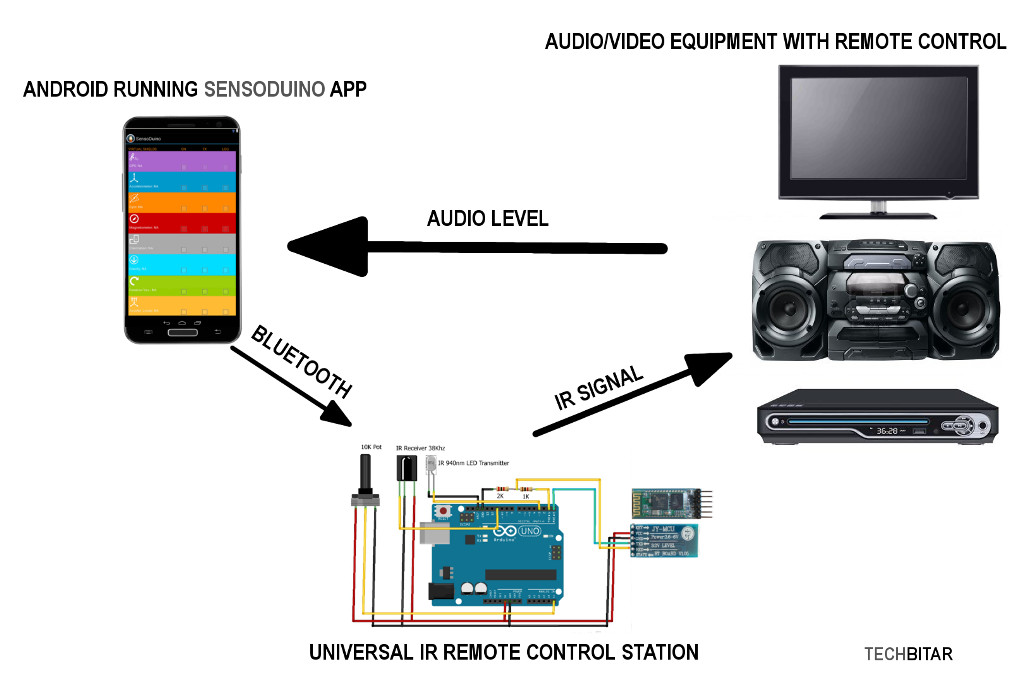
The star of the IR Station show is the SensoDuino free Android app which harnesses the sensors and functions of your Android phone then shares that info over Bluetooth with Arduino or any microcontroller with a serial Bluetooth transceiver. SensoDuino will pipe the Audio volume level data to the Arduino in the IR station via the HC-05 Bluetooth. The program running on Arduino will compare the audio sensor data it receives to a noise threshold you set with the potentiometer (or a constant value set in your program) and if the audio value is greater than our threshold of noise, Arduino transmits an IR signal to reduce the volume. It will continue to transit the volume down IR signal until the audio level is below the threshold value.
BUILD THE CIRCUITObtain the parts below and wire them accordingly.
HARDWARE
SOFTWARE
Ken Shirriff did an amazing job with his robust IRremote library. WIRING THE IR STATION CIRCUIT IR TRANSMITTER LED
IR 38KHZ RECEIVER (BULGE FACING YOU)
10K OHM POTENTIOMETER
HC-05 BLUETOOTH MODULE (BREAKOUT BOARD)
DECODE YOUR REMOTE CONTROL BUTTONS
There are many remote control protocols out there supported by leading vendors such as Sony, NEC, Panasonic, etc. If your TV is not one of those brand named, chances are its remote control adheres to one of the popular remote control protocols supported by the leading vendors.
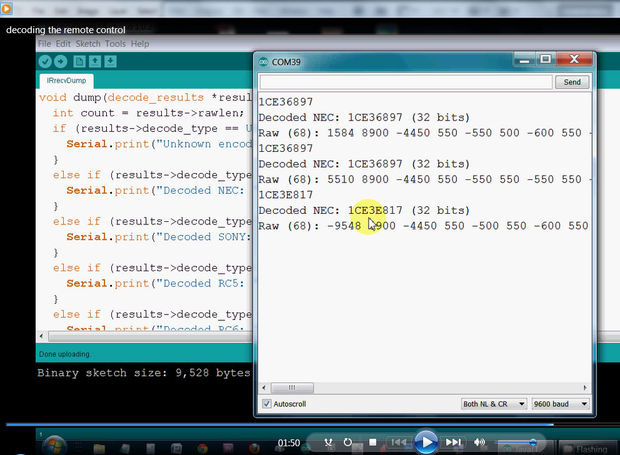
Since our gadget needs to simulate sending a Volume Down remote control command whenever the TV volume is too high, we need to figure out what's the code for any particular TV remote. This is done easily using the example program provided by the IRremote library. With the IR Station fully wired, connect your Arduino to your PC.
PREPARE THE ARDUINO PROGRAM FOR THE IR STATION
This Arduino program works for most remote controls but you need to tell it about your remote control protocol from the info you gathered in the previous step when you decoded your remote control buttons using IRrecvDump utility.
It's possible to make the remote selection dynamic during run time so you don't have to change and upload code but for this guide I will keep it simple. At the beginning of the Arduino program below there is a number of lines starting with #define LABEL NUMBER. Change the NUMBER value to control how the IR Station works. Here's an explanation of the relevant LABEL constants. REMOTE BUTTON CODE & BIT #define REMOTE_CODE Your remote code as returned by the IRrecvDump decoder utility prefixed with "0x" #define REMOTE_BIT Your remote code data size as returned by the IRrecvDump decoder utility. VOLUME LEVEL THRESHOLD #define THRESHOLD_VALUE If you don't plan to use the potentiometer to determine the threshold value that will be used to trigger the IR transmission, change the THRESHOLD_VALUE value to match your requirements. This is the number that decides at what point the Arduino will start transmitting the IR code, in our case the Volume Down IR codes VOLUME CHANGE INTENSITY #define REPEAT_TX (from 1 to as many as you want. Start with 3 then fine tune) Change how many times you want the IR remote code transmitted to the TV or remote controlled device. If you want more drastic drop in TV volume increase this number. If you want a more gradual change in volume, lower this number. FIRMWARE FOR THE IR REMOTE CONTROL STATION
// You can copy & paste this code into Arduino and upload it
/* PROJECT: SensoDuino Universal IR Remote Control Station 0.1 PROGRAMMER: Hazim Bitar (techbitar.com) DATE: NOV 25, 2013 FILE: sensoduino_ir_station.ino (based on sensoduino.ino) LICENSE: Public domain */ #include <IRremote.h> #define THRESHOLD_VALUE 0 // Set critical level to detect. Ignore if potentiometer is used #define REPEAT_TX 3 // How many times to transmit the IR remote code #define REMOTE_CODE 0x1CE3E817 // remote code to transmit for volume down for my TV. Replace with your device IR code #define REMOTE_BIT 32 #define LED 13 // LED used to blink when volume too high IRsend irsend; // instantiate IR object #define START_CMD_CHAR '>' #define END_CMD_CHAR '\n' #define DIV_CMD_CHAR ',' #define DEBUG 1 // Set to 0 if you don't want serial output of sensor data String inText; float value0, value1, value2; // vars containing sensor values. void setup() { // This is the Sensor Help List for sensor numbers Serial.begin(9600); // 9600 is the default speed of the HC-05 and most Bluetooth serial modules Serial.println("\nSensoDuino 0.13 by TechBitar.com (2013).\n"); Serial.println("Android Sensor Type No: "); Serial.println("1- ACCELEROMETER (m/s^2 - X,Y,Z)"); Serial.println("2- MAGNETIC_FIELD (uT - X,Y,Z)"); Serial.println("3- ORIENTATION (yaw, pitch, roll)"); Serial.println("4- GYROSCOPE (rad/s - X,Y,Z)"); Serial.println("5- LIGHT (SI lux)"); Serial.println("6- PRESSURE (hPa millibar)"); Serial.println("7- DEVICE TEMPERATURE (C)"); Serial.println("8- PROXIMITY (Centimeters or 1,0)"); Serial.println("9- GRAVITY (m/s^2 - X,Y,Z)"); Serial.println("10- LINEAR_ACCELERATION (m/s^2 - X,Y,Z)"); Serial.println("11- ROTATION_VECTOR (X,Y,Z)" ); Serial.println("12- RELATIVE_HUMIDITY (%)"); Serial.println("13- AMBIENT_TEMPERATURE (C)"); Serial.println("14- MAGNETIC_FIELD_UNCALIBRATED (uT - X,Y,Z)"); Serial.println("15- GAME_ROTATION_VECTOR (X,Y,Z)"); Serial.println("16- GYROSCOPE_UNCALIBRATED (rad/s - X,Y,Z)"); Serial.println("17- SIGNIFICANT_MOTION (1,0)"); Serial.println("95 - TIME (H,M,S)"); Serial.println("96 - DATE (Y,M,D)"); Serial.println("97 - AUDIO (Vol.)"); Serial.println("98 - GPS1 (lat., long., alt.)"); Serial.println("99 - GPS2 (bearing, speed, date/time)"); Serial.println("\n\nNOTE: IGNORE VALUES OF 99.99\n\n"); Serial.flush(); pinMode(LED, OUTPUT); } void loop() { Serial.flush(); int inCommand = 0; int sensorType = 0; unsigned long logCount = 0L; char getChar = ' '; //read serial // wait for incoming data if (Serial.available() < 1) return; // if serial empty, return to loop(). // parse incoming command start flag getChar = Serial.read(); if (getChar != START_CMD_CHAR) return; // if no command start flag, return to loop(). // parse incoming pin# and value sensorType = Serial.parseInt(); // read sensor typr logCount = Serial.parseInt(); // read total logged sensor readings value0 = Serial.parseFloat(); // 1st sensor value value1 = Serial.parseFloat(); // 2rd sensor value if exists value2 = Serial.parseFloat(); // 3rd sensor value if exists // Show sensor and values of sensors for debugging. if (DEBUG) { Serial.print("Sensor type: "); Serial.println(sensorType); Serial.print("Sensor log#: "); Serial.println(logCount); Serial.print("Val[0]: "); Serial.println(value0); Serial.print("Val[1]: "); Serial.println(value1); Serial.print("Val[2]: "); Serial.println(value2); Serial.println("-----------------------"); delay(10); } // Change the sensor number to match the senor you which to read. See Sensor Help List above. if (sensorType != 97) return; // If I am not reading Audio Sensor values, go back and keep reading. // Read the potentiometer value (0-1023)or assign VolValue // to constant THRESHOLD_VALUE if you don't want to use the potentiometer. int volValue = analogRead(A5); // Since my audio sensor on my Arduino returns values from 0 to 32K I will map it to Analog min/max float volLimit = volValue * (32000 / 1023.0); // 32K is about max returned by SensoDuino Audio sensor int soundLevel = value0; // Read the sound sensor from SensoDuino (Bluetooth) if(soundLevel > volLimit) // Compare to noise level threshold set by potentiometer. { digitalWrite(LED,HIGH); // while transmitting IR turn LED on delay(200); for (int txCount = 0; txCount < REPEAT_TX; txCount++) { // Transmit the IR remote code irsend.sendNEC(REMOTE_CODE , REMOTE_BIT); // See commented list below and replace to match your IR system delay(200); // Uncomment the function that matches your remote control protocol as shown by IRrecvDump // irsend.sendNEC(REMOTE_CODE, REMOTE_BIT); // irsend.sendSony(REMOTE_CODE, REMOTE_BIT); // irsend.sendRC5(REMOTE_CODE, REMOTE_BIT); // irsend.sendRC6(REMOTE_CODE, REMOTE_BIT); } } digitalWrite(LED,LOW); // when done transmitting IR, turn LED off } |
- Home
- About
-
Projects
- LuxBlaster
- SensoDuino
- ArduDroid: Simple Bluetooth control for Arduino and Android
- TV Volume Loudness Guard
- Geo Data Logger
- Face Tracking with Arduino and OpenCV
- Kinect Controls Servos Using Human Motion
- Fast Line-following Robot
- BridgeDuino
- Universal IR Remote Control Station for Android
- Bluetooth-controlled Pan-Tilt Servo
- Modify The HC-05 Bluetooth Module Defaults Using AT Commands
- Bluetooth Comm for Arduino and PC
- GOduino: The Breadboard-friendly Robot Controller
- How to Network Many Arduinos with Sensors using I2C
- Your Android Phone Is A Sensors & Comm Nervana
- Blog
